
Here’s a quick question for you all? How many of you have had trouble while adjusting the dimensions of the Twitter header in your Twitter profile? We hope you’ll be honest with us! Yes, we knew! Almost all of you have been toiling hard and burning midnight oil while looking to size your Twitter header appropriately. The issue is that despite the fact that Twitter has given elaborate guidelines regarding the picture size required for the header, most of us have found it extremely taxing to size our header properly. This is mainly due to the Twitter’s penchant to cut off a portion of your photograph even if you’ve managed to adjust the size of your header in accordance with the dimensions stipulated by Twitter in their guidelines.
Moreover, there’s that added pressure of ensuring that the header photograph scales across displays of variable resolutions in the right manner. With all these troubling facts in the background, we bring to you glad tidings y’all! We are going to address all the above mentioned issues in our current post. In this post, we’ll be shedding some light on the exact Twitter header size that you should be using in your profile. In addition, we’ll also be giving you a few valuable tips to make sure that your header photo is portrayed the way you actually want it across multiple displays of varying screen resolutions.
Twitter’s Guidelines for Header Photos
Before we delve into the details of how to optimize your Twitter header size, here’s an overview of the guidelines recommended by Twitter for header photographs.
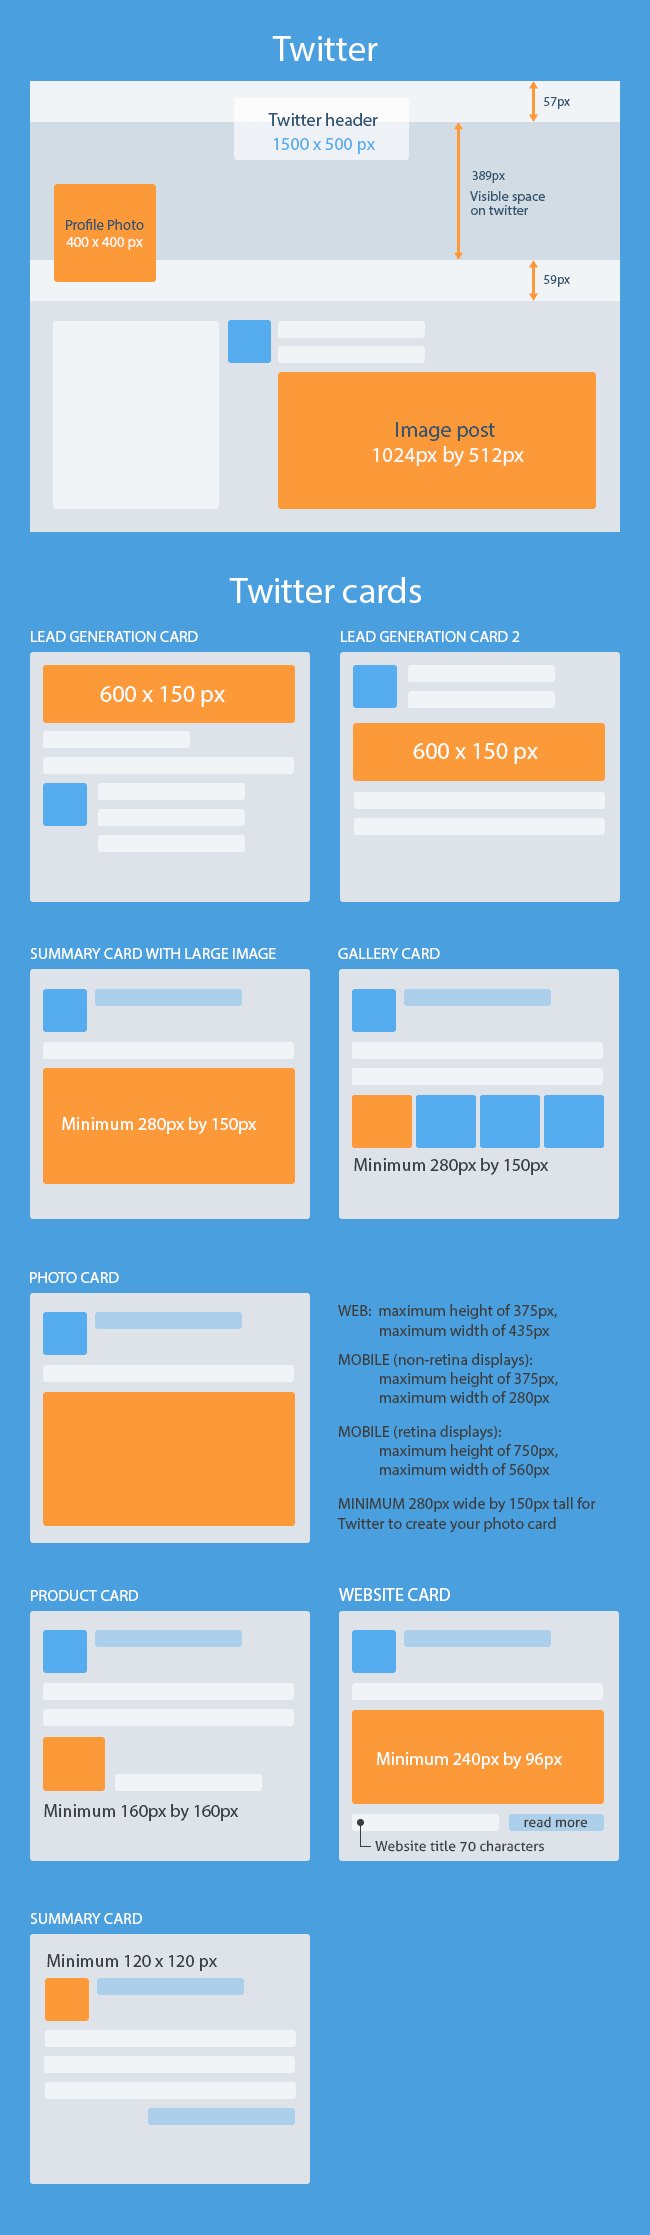
- The suggested dimensions of the header image are 1500 pixels by 500 pixels
- JPG, GIF or PNG are the supported formats for the Header images. Please note that Twitter does not support animated GIFs for the Twitter header
Let’s go through the conundrum once again…
You’ve followed the aforementioned guidelines in letter and spirit and yet when you’ve ended up uploading your photograph for the header, it looks absolutely preposterous. The reason for this that you need to take into consideration the space occupied by your profile image and the area that is hidden and we are going to call it the “invisible area”. In actual practice, the suggested dimensions for the Twitter header appear like the ones shown below:
Without wasting much time, let’s dive into the details of the area reserved for the profile picture and area that remains hidden in reality.
Accounting for Your Profile Picture
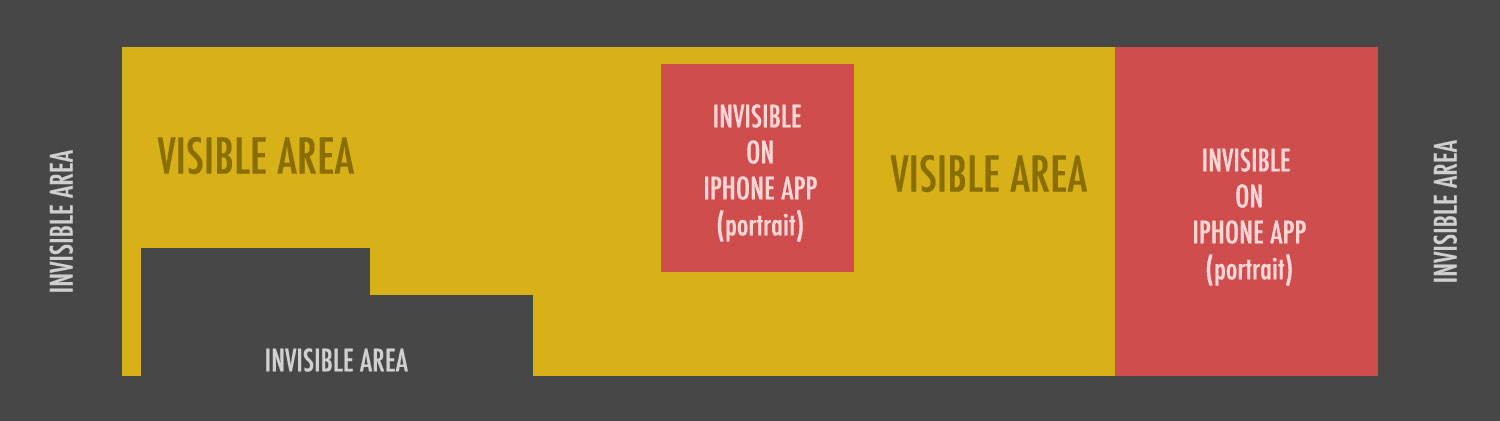
It is the interference between your profile picture and the header image that causes all the trouble and it’s much easier said than done. This is because of a technical reason: the location of your profile picture gets adjusted automatically vis-a-vis the header photograph in accordance with the display’s resolution.
Let’s consider the example in my case. Here, I have my cover image with my display’s resolution at complete width:
When the Twitter header photograph is portrayed at complete width, the profile image adjusts itself by moving towards the centre of the header photograph. However, as I bring the resolution of my display down, take a look at the profile picture which has begun to adjust itself towards the left side of the header image. Here’s the corollary: when the header is portrayed on displays with smaller resolution, the profile picture shifts itself towards the left side of the header image. Consequently, you ought to leave some additional space or unused area in the bottom left corner of your header photograph. Failing to do so, the inevitability of you ending up losing some vital elements in your header photograph as the profile picture gets in the way and obstructs their visibility.
Accounting for the “Invisible Area”
There is another aspect that you should take into account while adjusting the size of your photograph for the Twitter header. It is the Invisible Area. Despite the fact that Twitter suggests a header photograph of 1500 pixels by 500 pixels dimensions, the upper and lower portions of the image get cut off once uploaded. Just to to show you how this happens, take a glimpse of the 1500 pixels by 500 pixels sample photograph that I’ve created specifically for the Twitter header.
Now, have a look at the header and just consider how it looks like after I’ve uploaded by profile image. As I had predicted, the upper and lower portions of the header photograph have been cropped. So, you have to ensure that the hidden areas at the top and bottom of the header image are taken care of.
The Ideal Twitter Header Size
Here’s what we suggest for your Twitter header dimensions and size:
- Utilize the Twitter recommended dimensions of 1500 pixels by 500 pixels for the header photograph
- Leave some void at the top and bottom of the header image to account for the invisible area
- Also, leave sufficient space for the profile picture to the left of the header image so that the screens with different resolutions are taken care of

How We are Solving This Problem with “Snappa”
One can really get flustered in attempt to appropriately adjust the size of the Twitter header so that important pieces of information displayed in the header photograph do not get chopped off. In order to get rid of this issue, we want you to check out the website Snappa. So, when you build Twitter header images, you can do it easily. Hence, there’s no point spending hours and hours of your precious time adjusting the size of the Twitter header.
The Upshot
The reality must have dawned upon you that it is not easy by any stretch of imagination to adjust the size of the Twitter header appropriately. We hope that you’ll get a lot out of this guide and will be able to size your Twitter header photograph with immaculate precision without running into any bad experience now that you know the truth! Grab following social media sheet for your reference.